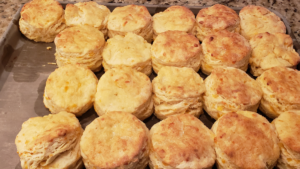
Like other doughs, this dough can be frozen easily without harming the ingredients. The added cheese freezes well and will work well in the dough when it is cooked. This recipe is 6 times my normal Garlic and Cheddar Cheese Biscuits recipe, based on using a whole 5# bag of flour. You will freeze the biscuits raw, seal them, and freeze them in batches. This will allow you to have biscuits anytime, without the mess every time.

Batch Garlic and Cheddar Cheese Biscuit Dough
Ingredients
- 2160 g All Purpose Flour I use King Arthur brand
- 144 grams Baking Powder I use Clabber Girl
- 115 grams Baking Soda
- 36 grams Kosher Salt, Morton brand
- 1 tbsp Granulated Garlic
- 3 cup Butter, Unsalted Grass fed, Unsalted
- 7.5 cup Buttermilk
- 1.5 lb Medium Cheddar Cheese, shredded Or your favorite cheddar cheese
- 1 cup All Purpose Flour
- 1 cup Butter, salted Grass fed, Salted for brushing
Instructions
Equipment Needed
- Food Processor OR Pastry Cutter OR Large Fork
- Rolling Pin OR Clean Wine Bottle
- Sheet Pan (half size)
- Biscuit Cutter
- Pastry Brush
Must Know Tips
- Make sure your butter, lard, or shortening is very cold. It needs to be cold so that it doesn't melt before the dough can set from the heat. When the dough sets first, the fat melts later and keeps the bread light and fluffy with tiny air pockets of moistened dough. If you let the fat get to room temperature or warm before you cook the biscuits, they will not be as airy.One tip is the freeze the butter and dry ingredients after the butter is cut in. This will keep them cold while working with the dough.Do not overwork the dough. When the dough comes together in the bowl, pour it out onto the cold counter. Fold and rotate the dough 12 times. If you do this less than 12 times, you may not work the baking powder in properly resulting in a weird aftertaste. If you do this more than 12 times you run the risk of too much gluten forming in the dough, causing a tough biscuit. We call those dumplings or hard rolls, lol.Make sure your wet ingredients are cold. This will help preserve the physical integrity of the fat.
Recipe Instructions
- Preheat the oven to 450 degrees Fahrenheit. Gather your equipment and ingredients.
- Let's start with the dry ingredients and cut in the fat. Sift all the dry ingredients together to get them well-mixed. Since an entire 5# bag of flour will be used, remove 1 cup of flour from the bag and set it aside as your bench flour. The rest of the flour can now be mixed with the other dry ingredients.
- Next is to cut in the fat. I use a food processor and start with the dry ingredients, cube my cold butter, and add it to the flour. I pulse the processor until the butter has been cut into small pea-sized pieces.
- If you do this by hand, you can use a pastry cutter or a large fork and keep cutting the butter into the flour until it is the right size.
- At this point add the cheese to the dry mix with butter and mix thoroughly with a couple of tosses by hand.
- Next, add most of the buttermilk to the dry ingredients, reserving about 1 cup, and use a large wooden spoon to mix the dough. Use the spoon to keep from touching it with your warm hands. You do not want that butter to get soft. When the dough starts to come together, pour it out onto your counter and quickly fold it 12 times. Keep the folds loose but use that movement to shape the dough ball into an oval or rectangle. If the dough is too dry, use the buttermilk you reserved to get the dough to perfect consistency while folding. Use the spoon to keep from touching it with your warm hands. You do not want that butter to get soft. When the dough starts to come together, pour it out onto your counter and quickly fold it 12 times. Keep the folds loose but use that movement to shape the dough ball into an oval or rectangle.
- Use a rolling pin to roll out the dough ball to a thickness of about 3/4″ thick.
- Use a biscuit cutter to closely cut the biscuits. Dipping the cutter in flour between each biscuit. Do not twist the cutter. Go straight down and then back up.
- Arrange the biscuits on an ungreased sheet pan. Place them together so they are all touching to maximize space on the pan. Cover with another pan, clean tea cloth or parchment paper, and place the pan in the freezer for 2 hrs.Bag the frozen biscuits uncooked into the portions you will bake them. If you are using them within 2 weeks, ziplock freezer bags will be fine. If you plan to keep them in the freezer longer, vacuum seal them with parchment paper between any layers to prevent them from sticking together.Label and date the bags and keep them in your freezer. for up to 10-12 months.
Cooking the Biscuits
- Arrange the biscuits on an ungreased sheet pan. Let them thaw for an hour. You can also let them thaw in the fridge overnight. Place them together if you want them to rise taller or keep them apart for them to rise in all directions.
- Bake in the middle rack for 13-15 minutes.
- Remove immediately from the oven and brush the tops with melted salted butter.

- Serve as is, with jam, covered in gravy, or as a sandwich.

Discover more from In The Kitchen With Vic
Subscribe to get the latest posts sent to your email.


